
F1r3Fly G3: Difference between revisions
From Fen Spinner Wiki
More actions
No edit summary |
mNo edit summary |
||
| (8 intermediate revisions by the same user not shown) | |||
| Line 8: | Line 8: | ||
|cog=COP | |cog=COP | ||
}} | }} | ||
The F1r3Fly G3 is a single sided mod that is noteworthy for its difficult construction and unique aesthetic appeal. Due to needing to sand the front of the mod, it is very fragile and prone to breaking if dropped. For this reason it's usually made as a demonstration of modding ability and not as a mod to spin. | The F1r3Fly G3 is a single sided mod that is noteworthy for its difficult construction and unique aesthetic appeal. Due to needing to sand the front of the mod, it is very fragile and prone to breaking if dropped. For this reason it's usually made as a demonstration of modding ability and not as a mod to spin. | ||
| Line 14: | Line 13: | ||
List from the UPSB V5 wiki archive.<ref>[https://web.archive.org/web/20181001215931/http://www.upsb.info/wiki/index.php?title=F1r3Fly_G3_Mod UPSB V5 Wiki Archive]</ref> | List from the UPSB V5 wiki archive.<ref>[https://web.archive.org/web/20181001215931/http://www.upsb.info/wiki/index.php?title=F1r3Fly_G3_Mod UPSB V5 Wiki Archive]</ref> | ||
===Parts needed=== | ===Parts needed=== | ||
* | * 1x [[Pilot G3|Metal G3]] (everything except grip and backplug) | ||
* | * 1x [[Pilot G2|G2]] (body) | ||
* | * 1x [[Faber Castell Grip Matic|Grip Matic]] (tip) | ||
* | * 1x [[Pentel Hybrid Gel Grip|HGG]] (tip, grip) | ||
* | * 1x [[Pilot Dr. Grip|Dr. Grip]] (grip) | ||
* | * 1x [[Sailor IC Liquid Gel|Sailor Gel]] (grip) or any pen with an opaque grip | ||
====Additional Items==== | |||
* File or sandpaper | |||
* Nail or toothpick | |||
* Electrical tape | |||
* Saw | |||
* Hot glue | |||
* Blade | |||
====Insert Dimensions==== | ====Insert Dimensions==== | ||
* G2: 5.6cm x 2.8cm | * G2: 5.6cm x 2.8cm | ||
| Line 25: | Line 32: | ||
* Cap: 3.7cm x 3.8cm | * Cap: 3.7cm x 3.8cm | ||
===Text tutorial=== | ===Text tutorial=== | ||
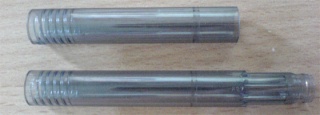
# Unscrew the barrel of the G2 from the grip portion and cut it 5.6cm from the front. <br>[[File:F1r3Fly G3 P1.jpg|200px|thumb|left]]<br clear=all> | # Unscrew the barrel of the G2 from the grip portion and cut it 5.6cm from the front.<br>[[File:F1r3Fly G3 P1.jpg|200px|thumb|left]]<br clear=all> | ||
# Remove the cap, tip, grip, and backplug from the G3. | # Remove the cap, tip, grip, and backplug from the G3, and add your desired insert. | ||
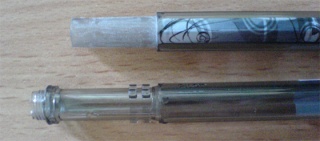
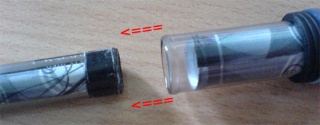
# Cut off the front of the G3 from the rimmed portion. Evenly sand down the front until you can securely attach the G2 barrel from the back with an insert. <br>[[File:F1r3Fly G3 P2.jpg|200px|thumb|left]]<br clear=all> | # Cut off the front of the G3 from the rimmed portion. Evenly sand down the front until you can securely attach the G2 barrel from the back with an insert.<br>[[File:F1r3Fly G3 P2.jpg|200px|thumb|left]]<br clear=all> | ||
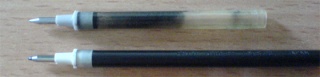
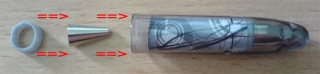
# | # Clear the G3 inktube of ink and cut 7.4cm from the tip.<br>[[File:F1r3Fly G3 P3.jpg|200px|thumb|left]]<br clear=all> | ||
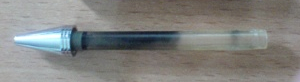
# Unscrew the tip from the Grip Matic and remove the lead mechanism inside the tip. Glue the tip onto the G3 inktube.<br>[[File:F1r3Fly G3 P4.jpg|200px|thumb|left]]<br clear=all> | |||
# Remove the grips from the Dr. Grip and the Sailor Gel. | |||
# From the lip of the Dr. Grip grip, cut 3 sections with these lengths respectively: 1.3cm - 0.8cm - 0.7cm. | |||
# Cut 5 sections of the Sailor Gel grip. Two will each have two rings and three will each have three rings (2-2-3-3-3). You may make changes as you see fit. | |||
# Place the grip sections onto the G2 barrel. They should have this order: 1.3cm DGG - 2 Sailor - 0.8cm DGG - 2 Sailor - 0.7cm DGG - 3 Sailor.<br>[[File:F1r3Fly G3 P5.jpg|200px|thumb|left|Red indicates DGG length in cm, white indicates Sailor Gel rings]]<br clear=all> | |||
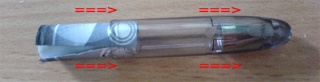
# Insert the G3 inktube with the insert into the G2 barrel.<br>[[File:F1r3Fly G3 P6.jpg|200px|thumb|left]]<br clear=all> | |||
# Carefully attach the back of the G2 onto the front of the G3. The G3 should fit between the insert and the inktube. Sand the G3 if necessary until a tight and secure fit.<br>[[File:F1r3Fly G3 P7.jpg|200px|thumb|left]]<br clear=all> | |||
# Remove the clip of the G3 and the rubber stopper inside. Sand down the remaining protrusion of the clip until it's level with the rest of the cap. | |||
# Remove the tip and grip from the HGG and cut 0.5cm from the grip. | |||
# Insert the G3 tip into the cap. Wrap the longer section of the cut HGG grip with an insert and push it into the G3 cap.<br>[[File:F1r3Fly G3 P8.jpg|200px|thumb|left]]<br clear=all> | |||
# Insert the HGG tip and grip into the cap, inside the longer HGG grip, and push it all the way in until the rattling stops.<br>[[File:F1r3Fly G3 P9.jpg|200px|thumb|left]]<br clear=all> | |||
# Cut 1cm of Dr. Grip grip and place it between the remaining Sailor Gel grip sections onto the G3 cap.<br>[[File:F1r3Fly G3 P10.jpg|200px|thumb|left]]<br clear=all> | |||
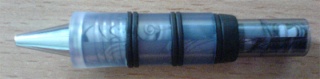
# Wrap a thin layer of electrical tape on the back of the G3 barrel and attach the cap onto it.<br>[[File:F1r3Fly G3 P11.jpg|200px|thumb|left]]<br clear=all> | |||
===Video tutorial=== | ===Video tutorial=== | ||
<youtube>https://youtu.be/fkkLT3J-ImM</youtube> | <youtube>https://youtu.be/fkkLT3J-ImM</youtube> | ||
| Line 36: | Line 55: | ||
==References== | ==References== | ||
[[Category: Pen Mods]] | [[Category: Pen Mods]] [[Category:G3 Mods]] | ||
Latest revision as of 01:56, 16 January 2022
The F1r3Fly G3 is a single sided mod that is noteworthy for its difficult construction and unique aesthetic appeal. Due to needing to sand the front of the mod, it is very fragile and prone to breaking if dropped. For this reason it's usually made as a demonstration of modding ability and not as a mod to spin.
Construction
List from the UPSB V5 wiki archive.[1]
Parts needed
- 1x Metal G3 (everything except grip and backplug)
- 1x G2 (body)
- 1x Grip Matic (tip)
- 1x HGG (tip, grip)
- 1x Dr. Grip (grip)
- 1x Sailor Gel (grip) or any pen with an opaque grip
Additional Items
- File or sandpaper
- Nail or toothpick
- Electrical tape
- Saw
- Hot glue
- Blade
Insert Dimensions
- G2: 5.6cm x 2.8cm
- G3: 8.4cm x 2.5cm
- Cap: 3.7cm x 3.8cm
Text tutorial
- Unscrew the barrel of the G2 from the grip portion and cut it 5.6cm from the front.
- Remove the cap, tip, grip, and backplug from the G3, and add your desired insert.
- Cut off the front of the G3 from the rimmed portion. Evenly sand down the front until you can securely attach the G2 barrel from the back with an insert.
- Clear the G3 inktube of ink and cut 7.4cm from the tip.
- Unscrew the tip from the Grip Matic and remove the lead mechanism inside the tip. Glue the tip onto the G3 inktube.
- Remove the grips from the Dr. Grip and the Sailor Gel.
- From the lip of the Dr. Grip grip, cut 3 sections with these lengths respectively: 1.3cm - 0.8cm - 0.7cm.
- Cut 5 sections of the Sailor Gel grip. Two will each have two rings and three will each have three rings (2-2-3-3-3). You may make changes as you see fit.
- Place the grip sections onto the G2 barrel. They should have this order: 1.3cm DGG - 2 Sailor - 0.8cm DGG - 2 Sailor - 0.7cm DGG - 3 Sailor.
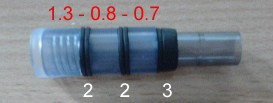
Red indicates DGG length in cm, white indicates Sailor Gel rings - Insert the G3 inktube with the insert into the G2 barrel.
- Carefully attach the back of the G2 onto the front of the G3. The G3 should fit between the insert and the inktube. Sand the G3 if necessary until a tight and secure fit.

- Remove the clip of the G3 and the rubber stopper inside. Sand down the remaining protrusion of the clip until it's level with the rest of the cap.
- Remove the tip and grip from the HGG and cut 0.5cm from the grip.
- Insert the G3 tip into the cap. Wrap the longer section of the cut HGG grip with an insert and push it into the G3 cap.
- Insert the HGG tip and grip into the cap, inside the longer HGG grip, and push it all the way in until the rattling stops.
- Cut 1cm of Dr. Grip grip and place it between the remaining Sailor Gel grip sections onto the G3 cap.

- Wrap a thin layer of electrical tape on the back of the G3 barrel and attach the cap onto it.


Video tutorial
Video tutorial by Oleg.